When working with word processors like Microsoft Word, Google Docs, or similar software, setting tab stops can help align text precisely, whether you’re creating a table of contents, formatting a document professionally, or simply organizing data neatly. However, you might occasionally set a tab stop incorrectly or change your mind about where you want the text to align. That’s when knowing how can you remove tab stop markers from ruler becomes essential.
In this detailed guide, we will explore everything you need to know about tab stops, their significance, methods to remove them, common issues, and best practices to keep your documents clean and well-formatted.
What Are Tab Stop Markers?
Before discussing their removal, it’s important to understand what tab stop markers are.
A tab stop is a predefined stopping point along the document’s horizontal ruler where the cursor moves when you press the Tab key. It controls text alignment, allowing you to easily line up text elements vertically across lines.
Tab stop markers are visible symbols on the ruler. They indicate the locations where these stops are set and define how the text will behave (align left, center, right, decimal, or bar) when you press the Tab key.
Types of Tab Stops:
- Left Tab: Text extends to the right.
- Center Tab: Text is centered on the tab stop.
- Right Tab: Text extends to the left.
- Decimal Tab: Aligns numbers around a decimal point.
- Bar Tab: Inserts a vertical line through the text.
Now, if you accidentally place too many tab stops or you want to modify your layout, you’ll need to remove or adjust these markers.
Why You May Need to Remove Tab Stop Markers
Several situations demand removing tab stop markers:
- Incorrect formatting or alignment
- Redesigning document layouts
- Replacing manual tabulations with tables
- Standardizing document formatting
- Cleaning up cluttered or inherited documents
Without cleaning unnecessary tab stops, a document may look messy, unprofessional, and even confusing for readers.
How Can You Remove Tab Stop Markers from Ruler: Step-by-Step Methods
Depending on the software you are using, the method to remove tab stops may slightly vary. Let’s walk through the process for different popular platforms:
Microsoft Word (Desktop Version)
Microsoft Word remains the most widely used word processor globally, so we’ll start here.
Step-by-Step:
- Open the Document:
Open your document in Microsoft Word. - Show the Ruler:
If you don’t see the ruler, click on the View tab and check the Ruler checkbox. - Locate the Tab Markers:
Look at the horizontal ruler above your document. You will see small symbols (like an “L” for a left tab) indicating where tab stops have been set. - Remove a Single Tab Stop:
- Simply click and drag the tab stop marker downward (off the ruler).
- Release the mouse button when it disappears.
- Remove All Tab Stops:
- Select the paragraph(s) you want to clear tab stops from.
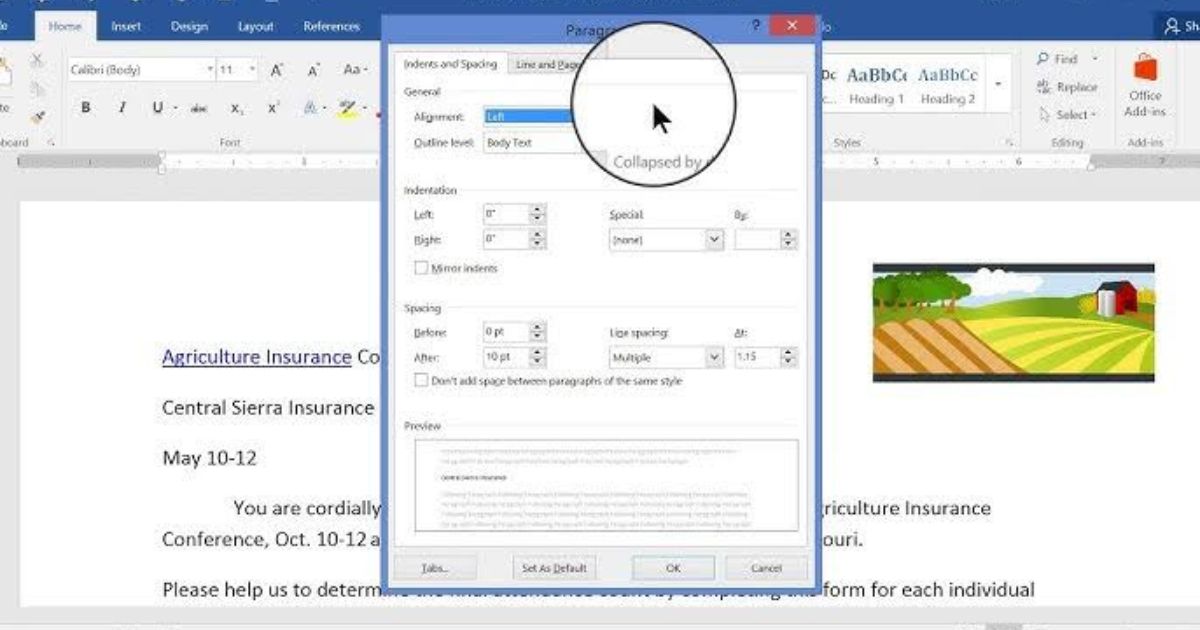
- Right-click on the selection and choose Paragraph.
- In the Paragraph dialog box, click Tabs… (bottom left).
- In the Tabs window, click Clear All.
- Click OK to apply.
Microsoft Word (Web Version)
The web version is slightly different but similar.
- Select the text where tab stops are applied.
- Click on Layout or Home tab.
- Look for paragraph settings and click Tabs.
- Delete or clear tab stops individually or all at once.
Google Docs
While Google Docs doesn’t have the same rich tab settings as Word, you can still add and remove tab stops.
Removing Tab Stops:
- Open your document in Google Docs.
- Locate the blue markers on the ruler.
- Click and drag the tab marker downward off the ruler to remove it.
- It disappears when removed successfully.
Other Word Processors (LibreOffice, WPS Office, Pages)
In tools like LibreOffice Writer, the method is similar:
- Open the document.
- Show the ruler.
- Drag unwanted tab stops off the ruler.
In Apple Pages:
- Select the text.
- Drag tab stops off the ruler to delete them.
Keyboard Shortcuts (Where Available)
In Microsoft Word, pressing Ctrl + Q removes paragraph formatting (including tab stops) but be careful, as it may also reset indents and other paragraph styles.
Tips for Efficient Tab Stop Management
- Plan Layouts in Advance:
Before setting multiple tab stops, plan your layout to avoid excessive adjustments later. - Use Styles:
Instead of manually adding tab stops, create custom paragraph styles with pre-set tab stops. This saves time and maintains consistency. - Use Tables When Appropriate:
For complex alignments (such as financial reports), using a table may be better than manually setting tab stops. - Avoid Manual Spaces:
Don’t replace tab stops by inserting multiple spaces manually. It’s inefficient and disrupts formatting, especially when editing later. - Regular Clean-up:
Occasionally audit your documents to clear unnecessary tab stops for better readability.
Common Problems When Removing Tab Stop Markers
1. Tab Markers Reappear
Sometimes after deleting tab markers, they seem to “come back” when you press Tab again. This usually happens because default tab settings (every 0.5 inches, for instance) are still active. Only custom tab stops are removed by dragging; defaults remain unless changed in settings.
Solution: Adjust default tab settings under paragraph formats or ruler settings.
2. Removal Not Applying to Entire Document
If you only select a portion of the text, only that section’s tab stops will be affected.
Solution: Select the entire document (Ctrl + A) before clearing tab stops if you want global changes.
3. Inconsistent Formatting After Removing Tab Stops
When you remove tab stops, text may shift unexpectedly.
Solution: Reformat the paragraph immediately after removal, using left alignment or indentations as necessary.
Best Practices for Using Tab Stops
To avoid needing frequent removal of tab stop markers:
- Use minimal and necessary tab stops.
- Maintain uniform spacing standards across documents